Thursday, January 23, 2020

This organization isn't authorized to upload change sets to other organizations. For authorization, contact the deployment connections administrators on the organizations where you want to upload changes.


Soooo..... I refreshed my sandbox environment to create a partial copy of production.

Added my new components and merrily attempted to deploy them to production.

All of a sudden I was posed with :

This organization isn't authorized to upload change sets to other organizations. For authorization, contact the deployment connections administrators on the organizations where you want to upload changes.

There is a simple fix for this.


  • Logon to your production environment
  • Launch Set Up
  • Enter Deployment in the quick find box.

  • Select Edit next to the environment (e.g. Sandbox) where you received the error
  • Now tick the box that allows connections

  • Once done with ticking the radio button, hit save.
You should now be able to go back to your Sandbox and deploy.

Happy Trails
Jerome Slinger


Tuesday, December 17, 2019

Salesforce - Find the list of required fields for any Object


Sometimes we find ourselves in a situation where we need to identify all the required fields for an object.

This is useful  for feedback to business or when preparing for a migration.

Yes, I know we could have gone the route of using the developer console, Apex code and so much more but for this solution we are going with simplicity :-)


  1. Select your avatar/profile
  2. Then Select Switch to Salesforce Classic (Under Options)
  3. Navigate to Setup
  4. Look for Field Accessibility under Security Controls
  5. Pick an Object > View by Profile > Pick a Profile
  6. Required Fields display in Red


May the force be with you and happy trails.

Jerome Slinger


Monday, December 2, 2019

Salesforce Lightning - Using the "lightning:fileUpload"

Sometimes we find ourselves in a situation where the standard file upload process just doesn't meet the required grade.

This is when we have to dust off the old developer console and write some code :-)

Step 1: Login to your Salesforce and open developer console (I always recommend your Sandbox first). 

tep 2: Navigate to File | New | Apex Class and Create an Apex controller called UploadManager. Replace following code in apex controller.  

UploadManager.apxc


 public class UploadManager{
    
@AuraEnabled  
   public static List getFiles(string recordId){  
     List DocumentList = new List();  
     Set documentIds = new Set();  //store file ids
     List cdl=[select id,LinkedEntityId,ContentDocumentId from ContentDocumentLink where LinkedEntityId=:recordId];  
     for(ContentDocumentLink cdLink:cdl){  
       documentIds.add(cdLink.ContentDocumentId);  // Document ids
     }      
     DocumentList = [select Id,Title,FileType,ContentSize,Description from ContentDocument where id IN: documentIds];  
     return DocumentList;  
   }  
   @AuraEnabled  
   public static List UpdateFiles(string documentId,string title,string recordId){  
     system.debug('title: ' +title);  
     ContentDocument cd = [select id,title from ContentDocument where Id=:documentId]; // Getting files from Parent record 
     cd.Title = title;  // Changing file Title with user entered title
     try{  
       update cd;  // Update ContentDocument (File)
     }  
     catch(DMLException e){  
       system.debug('Exception has occurred! ' +e.getMessage());  
     }  
      List DocumentList = new List();  
     Set documentIds = new Set();  
     List cdl=[select id,LinkedEntityId,ContentDocumentId from ContentDocumentLink where LinkedEntityId=:recordId];  
     for(ContentDocumentLink cdLink:cdl){  
       documentIds.add(cdLink.ContentDocumentId);  
     }      
     DocumentList = [select Id,Title,FileType,ContentSize,Description from ContentDocument where id IN: documentIds];  
     return DocumentList;  // Return list of files on parent record
   }  
 }  
Step 3: Navigate to File | New | Lightning Component and create a Lightning Component called FileUpload. Replace the following markup in the Lightning Component.

LightningFileUpload.cmp


LightningFileUploadController.js
({  
   doInit:function(component,event,helper){  
     var action = component.get("c.getFiles");  
     action.setParams({  
       "recordId":component.get("v.recordId")  
     });      
     action.setCallback(this,function(response){  
       var state = response.getState();  
       if(state=='SUCCESS'){  
         var result = response.getReturnValue();  
         console.log('result: ' +result);  
         component.set("v.files",result);  
       }  
     });  
     $A.enqueueAction(action);  
   } ,  
   //Open File onclick event  
   OpenFile :function(component,event,helper){  
     var rec_id = event.currentTarget.id;  
     $A.get('e.lightning:openFiles').fire({ //Lightning Openfiles event  
       recordIds: [rec_id] //file id  
     });  
   },  
   UploadFinished : function(component, event, helper) {  
     var uploadedFiles = event.getParam("files");  
     var documentId = uploadedFiles[0].documentId;  
     var fileName = uploadedFiles[0].name;  
     helper.UpdateDocument(component,event,documentId);  
     var toastEvent = $A.get("e.force:showToast");  
     toastEvent.setParams({  
       "title": "Success!",  
       "message": "File "+fileName+" Uploaded successfully."  
     });  
     toastEvent.fire();  
     /* Open File after upload  
     $A.get('e.lightning:openFiles').fire({  
       recordIds: [documentId]  
     });*/  
   },  
 })  

LightningFileUploadHelper.js
({  
       UpdateDocument : function(component,event,Id) {  
     var action = component.get("c.UpdateFiles");  
     var fName = component.find("fileName").get("v.value");  
     //alert('File Name'+fName);  
     action.setParams({"documentId":Id,  
              "title": fName,  
              "recordId": component.get("v.recordId")  
              });  
     action.setCallback(this,function(response){  
       var state = response.getState();  
       if(state=='SUCCESS'){  
         var result = response.getReturnValue();  
         console.log('Result Returned: ' +result);  
         component.find("fileName").set("v.value", " ");  
         component.set("v.files",result);  
       }  
     });  
     $A.enqueueAction(action);  
   },  
 })  


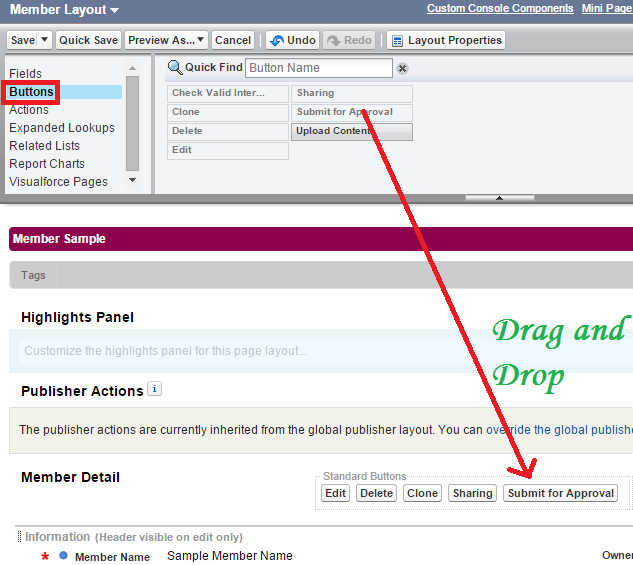
Step 4: To Create a quick action Navigate to Setup | Object Manager | Account |Buttons, Links and Actions | New Action. Fill all required fields and hit the Save button.


Create an Action

Step 5: To add quick action in account page layout Navigate to Setup | Object Manager | Account | Page Layouts. Edit Account Layout and move to Mobile & Lightning Actions.


Step 6: Drag File Upload quick action in  Salesforce Mobile & Lightning Experience Actions section and save the Account page layout.


Step 7: Open an account record and click on the File upload quick action button.


Output:


And just like that you are all done :-)

Happy Trails!

Monday, November 11, 2019

Salesforce Lightning - Accordion

So you are looking at adding an accordion to your lightning build?

No problem, lets get cracking.

Accordions became popular in the early 2000's and now we see it everywhere.


A basic accordion :

<button onclick="myFunction('Demo1')" class="w3-button w3-block w3-left-align">
Open Section 1</button>

<div id="Demo1" class="w3-container w3-hide">
  <p>Some text..</p>
</div>

<script>
function myFunction(id) {
  var x = document.getElementById(id);
  if (x.className.indexOf("w3-show"== -1) {
    x.className += " w3-show";
  } else {
    x.className = x.className.replace(" w3-show""");
  }
}
</script>


So in Salesforce the concept stays the same with a slight tweek to the implementation.
In lightning we work with components and this serves as the core of our building blocks.

In this example we will be working with the developer console but personally I find myself a fan of using visual studio code :-)

Select the lightning gear icon and then select developer console:


Once your console is launched:

Select File--New--Lightning Component

For this example we will be calling our component AccordionTest and select lightning Record page for your configuration.


Simply add the following code in the component section (CTRL+SHIFT+1)
Please remove the test code reference if you want to test it.

Add the following to the controller:

({
    handleShowActiveSectionName: function (cmp, event, helper) {
        alert(cmp.find("accordion").get('v.activeSectionName'));
    },
    handleToggleSectionD: function (cmp) {
        cmp.set('v.isDVisible', !cmp.get('v.isDVisible'));
    }
});

This will offer you the simplest start but I will soon write some code for a more production implementation.

Happy Trails
Jerome

Wednesday, August 28, 2019

Multiple approvers for Approval process in Salesforce Classic


1. Go to Setup >> Create>> Workflow and Approvals >> Approval Processes.


2. Select the object to create approval process.

3. Click "Create New Approval Process" button and click "Use Standard Setup Wizard" link.


4. Enter a name and description for your new approval process.

5. Click "Next" button.


6.  Specify Entry Criteria.

7. Click "Next" button.


8.  Specify Approver Field and Record Editability Properties.

9. Click "Next" button.


10. Select Notification Templates.

11. Click "Next" button.


12. Select Fields to Display on Approval Page Layout.

13. Click "Next" button.


14. Specify Initial Submitters.

15. Click "Save" button. 


16. Select "No, I'll do this later, take me to the approval process detail page to review what I've just created".

17. Click "Go" button.


 18. Click "New Approval Step' button.


19. Enter Name and Description.

20. Click "Next" button.


21. Specify Step Criteria.

22. Click "Next" button.


23. Select "Automatically assign to approver(s)".

24. Select the "Queue" or "User" or "Related User".

25. When multiple approvers are selected, select anyone of the following

    a. Approve or reject based on the FIRST response.
    b. Require UNANIMOUS approval from all selected approvers.

26. Click "Add Row" link to add multiple approvers. 

27. Click "Save" button.


28. Click "Activate" button to activate your approval process.


29. Go to the Object's page layout and add Submit for Approval button and Approval History related list.


30. Add "Submit for Approval" button.


31. Add "Approval History" related list.


Output:


Monday, August 26, 2019

Apex REST Code Sample Using RestRequest - Simple as Pie

I always wonder why people are not creating or interacting with Salesforce more using webservices.

If you are..then well done.

The world of possibilities and the layers of integration become infinite.

Always familiarize yourself with utilizing services and definitely create yourself a sandbox.


Apex REST Basic Code Sample

reference : https://developer.salesforce.com/docs/atlas.en-us.apexcode.meta/apexcode/apex_rest_code_sample_basic.htm

@RestResource(urlMapping='/Account/*')
global with sharing class MyRestResource {

    @HttpDelete
    global static void doDelete() {
        RestRequest req = RestContext.request;
        RestResponse res = RestContext.response;
        String accountId = req.requestURI.substring(req.requestURI.lastIndexOf('/')+1);
        Account account = [SELECT Id FROM Account WHERE Id = :accountId];
        delete account;
    }
  
    @HttpGet
    global static Account doGet() {
        RestRequest req = RestContext.request;
        RestResponse res = RestContext.response;
        String accountId = req.requestURI.substring(req.requestURI.lastIndexOf('/')+1);
        Account result = [SELECT Id, Name, Phone, Website FROM Account WHERE Id = :accountId];
        return result;
    }
  
  @HttpPost
    global static String doPost(String name,
        String phone, String website) {
        Account account = new Account();
        account.Name = name;
        account.phone = phone;
        account.website = website;
        insert account;
        return account.Id;
    }
}


example : https://developer.salesforce.com/docs/atlas.en-us.apexcode.meta/apexcode/apex_rest_code_sample_restrequest.htm

@RestResource(urlMapping='/MyRestContextExample/*')
global with sharing class MyRestContextExample {

    @HttpGet
    global static Account doGet() {
        RestRequest req = RestContext.request;
        RestResponse res = RestContext.response;
        String accountId = req.requestURI.substring(req.requestURI.lastIndexOf('/')+1);
        Account result = [SELECT Id, Name, Phone, Website FROM Account WHERE Id = :accountId];
        return result;
    }
  
}


As with the formula post this will be the start of a series where I will post more real life examples.

Stay tuned :-)


Monday, August 12, 2019

owner or user is inactive, orgId: 00DA0000000XXxx


So I ran into this nasty little bugger and my approval process came to a grinding halt.

For those who have never seen this before your first inclination is to research the error but this does not necessarily equal your solution.


Many refer you to batch jobs, Salesforce connections and more ...the bottom line is simple though....

What were you doing when you got this error?

For me, it was part of my approval process, so my next step was to investigate the process.

Salesforce>>Set Up>>Process Automation >> Approval Processes

 I had a user which was no longer active but was still part of the process.

Solution : Remove the user and my process was back on track


Sidebar : Never forget that it is important to look at ...


  • What was I doing that created the error?
  • Can I recreate it?
  • What does the error say?

If this doesn't assist in resolving your issue feel free to reach out to me and we find a solution together.

Yours in Tech 
Jerome Slinger 
“I cannot teach anybody anything. I can only make them think.”― Socrates

Tuesday, July 30, 2019

Salesforce formulas - Quick Reference

One should never underestimate the usefulness of the formula field.I have landed on many implementations where there was no initial data architecture taken into account....so there you are ...many questions from all over the business....and users threatening to use excel.

The formula field will be your compatriot in the battle against poor reporting and the demon called excel.


The simplest to start with will probably be your math operators :

Operator Description
+ (Add) Calculates the sum of two values
- (Subtract) Calculates the difference of two values.
* (Multiply) Multiplies its values.
/ (Divide) Divides its values.
^ (Exponentiation) Raises a number to a power of a specified number.
()(Open Parenthesis and Close Parenthesis) Specifies that the expressions within the open parenthesis and close parenthesis are evaluated first. All other expressions are evaluated using standard operator precedence.


After that we can start moving into logical operators

OperatorDescription
= and == (Equal) Evaluates if two values are equivalent. The = and == operator are interchangeable.
<> and != (Not equal)Evaluates if two values are not equivalent
* (Multiply)Multiplies its values.
/ (Divide)Divides its values.
^ (Exponentiation)Raises a number to a power of a specified number.
()(Open Parenthesis and Close Parenthesis)Specifies that the expressions within the open parenthesis and close parenthesis are evaluated first. All other expressions are evaluated using standard operator precedence.

I am working on more formula examples and will be posting them soon :-)

Stay tuned

Thursday, March 7, 2019

Salesforce and Visual Code

Greetings fellow Tech Warriors

Over the past two years I find myself using Visual Studio Code (VSC) more and more.

The tool has come to serve me well.

A large part of my focus has now gone into Salesforce development , especially Salesforce lightning.
To ensure that you are receiving the most from VSC make sure you have the right extension and preferably connect yourself to a Salesforce development environment (Its totally FREE).


So lets look at what to install and how to get fully connected.

The Salesforce Snippet :

Visual Studio Code is the go-to code editor for Salesforce developers. It's free, open-source, and available for Windows, Linux, and macOS.

This editor has easy-to-install extensions for syntax highlighting, code completion, and more.

  Visual Studio Code’s code completion in action. In this project, we install Visual Studio Code and the recommended Salesforce Extension Pack.
  1. Download and install the latest version of Visual Studio Code for your operating system. If you already have Visual Studio Code installed, there’s no need to reinstall it.
  2. Launch Visual Studio Code.
  3. On the left toolbar, click the Visual Studio Code's Extension icon Extensions icon.
  4. Search for Salesforce Extension Pack and click Install. If you already have it installed, then you just need to click on the Reload button. 

Let's not forget another fan favorite :

Salesforce CLI

Like many other programming languages and models, Salesforce includes a command-line interface (CLI). If you’ve ever used npm, yarn, gradle, or maven, Salesforce CLI will seem familiar to you—just tailor-made for Salesforce development tasks (and if those acronyms look like alphabet soup to you, that’s fine, too).

Salesforce CLI allows you to interact with your Salesforce environments in many ways, like retrieving or pushing code or interacting with data. The CLI consists of several plugins. These plugins provide important specific functionality. 

For example, the salesforcedx plugin provides the ability to interact with Salesforce orgs and their data.

If you already have Salesforce CLI installed, you can skip this section.
  1. Download Salesforce CLI using the appropriate link for your operating system:
    Operating System Link to Installer 
    macOS https://sfdc.co/sfdx_cli_osx  
    Windows 32-bit https://sfdc.co/sfdx_cli_win  
    Windows 64-bit https://sfdc.co/sfdx_cli_win64  
    Debian/Ubuntu 64 https://sfdc.co/sfdx_cli_linux
    Download the archive from one of the URLs in the manifest, extract the archive, then run the ./install script. 
    Debian/Ubuntu x86 https://sfdc.co/sfdx_cli_linux_x86
    Download the archive from one of the URLs in the manifest, extract the archive, then run the ./install script. 
  2. Run the downloaded installer.
  3. After the installation, open a command line prompt, such as cmd on Windows or Linux or Terminal on macOS.
  4. Run this command to confirm the correct installation: 
    sfdx plugins --core 
  5. You should see something like:
Terminal output of Salesforce CLI plugins.

The salesforcedx plugin should be listed as version 45.x.x or higher.

You’re all set with Salesforce CLI! That was easy, wasn’t it? 


Generate reports from Opportunities using a Visualforce Page in Salesforce

  Step 1: Create a Visualforce Page Go to the Setup menu in Salesforce. Search for "Visualforce Pages" in the Quick Find box and c...